This guide from Plunge Pools Sydney walks you through every stage of the installation from design and approvals to filling and final certification so you’ll know exactly what to expect from start to swim.
Step 1: Site Assessment and Design Consultation
Every fibreglass plunge pool installation starts with a detailed site assessment and design consultation. This stage sets the foundation for a safe, well-fitted, and council-approved pool.
During the visit, your installer carefully inspects your backyard layout, measures access points, and checks soil stability and drainage. These details determine the most practical pool size, placement, and construction method for your property.
Key checks include:
- Soil type and slope – to assess stability and prevent future movement or cracking.
- Access width for machinery – ensuring excavators or cranes can safely enter the site.
- Drainage and stormwater flow – confirming water will move away from structures and pool surrounds.
- Boundary offsets and fencing clearance – to comply with local building and pool safety regulations.
- Underground utilities – such as water, gas, and electrical lines that may affect excavation.
For Sydney homes, it’s common to encounter tight access, nearby retaining walls, or clay-based soil that needs extra preparation. A thorough site check helps plan around these challenges early and prevents costly surprises later.
Once the assessment is complete, the installer works with you on a custom pool layout, taking into account council zoning rules, sun exposure, and desired landscaping. This stage also includes permit preparation and design drawings, which typically take two to four weeks depending on site complexity and council approval timelines.
By finishing this step properly, your project begins with a clear design, accurate measurements, and all the right approvals in place setting up a smooth installation in the next phase.
Because tight access, clay soil, and retaining walls are common across Sydney suburbs, working with specialists in Sydney fibreglass plunge pool design and installation helps you choose the right shell size and placement before approvals begin.
Step 2: Council Approvals and Engineering Plans
Once your pool design is finalised, the next stage is securing council approvals and engineering documentation. This step ensures your fibreglass plunge pool meets all legal, safety, and structural standards before construction begins.
Sydney councils have strict regulations under the NSW Swimming Pools Act 1992 and BASIX (Building Sustainability Index) requirements. Getting the right approvals early prevents project delays and ensures your pool is fully compliant from the start.
During this phase, your installer or certifier prepares several key documents for submission:
Typical requirements include:
- Site and boundary plans – showing the exact position of the pool in relation to your house, fences, and other structures.
- Engineering drawings – verifying that the fibreglass shell and foundations can handle soil pressure and water load safely.
- Safety barrier and fencing plan – detailing compliant pool fencing, gate latches, and CPR signage for inspection approval.
- BASIX certificate – confirming your pool meets water efficiency and energy-saving targets for NSW homes.
- Stormwater and drainage plan – showing how overflow or backwash water will be safely directed to the drainage system.
For most Sydney suburbs, the approval process takes 10 to 20 business days, depending on council workload and document completeness. In some cases, private certifiers can issue faster approvals if all paperwork meets the current Australian Standards (AS1926.1) for safety barriers.
Your pool builder will often coordinate directly with local authorities, managing submissions and updates on your behalf. This makes the process easier for homeowners and avoids costly rework caused by missing details.
Once approval is granted, you’ll receive formal documentation to display on-site before excavation begins. At this stage, your fibreglass plunge pool project is officially ready to move into site preparation and excavation.
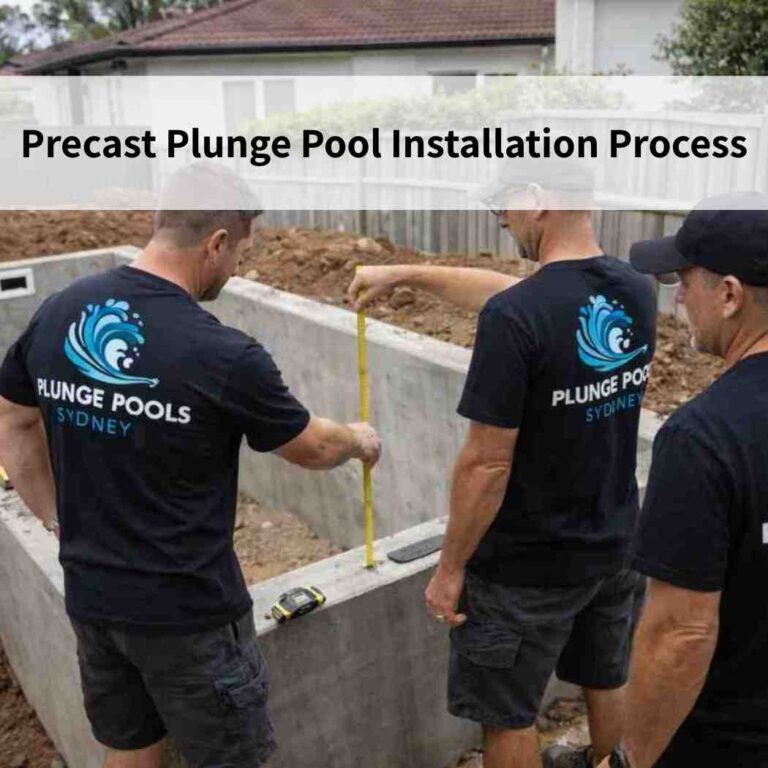
Step 3: Excavation and Site Preparation
With approvals complete, the next stage is excavation and site preparation where your backyard starts to take shape. This is one of the most important steps, as a strong, level base ensures your fibreglass plunge pool sits securely and performs well for decades.
Because many Sydney homes have tight access, our team often uses mini-excavators or bobcats that can fit through narrow side passages or under carports. If access is limited, temporary fencing or garden sections may be removed to make room for equipment.
Before digging begins, the installation team reviews your site and engineering plans to confirm the exact position, depth, and pool orientation. Utilities such as water, power, and gas lines are also checked and marked to avoid accidental damage during excavation.
Key preparation steps include:
- Clearing and protecting access areas – covering driveways and pathways to prevent damage from machinery.
- Excavating the pool cavity – digging the correct depth and width according to engineering specifications.
- Soil inspection and stability checks – Sydney’s soil varies widely: western suburbs often have dense clay, while coastal areas sit on sandstone or sandy loam. Each type requires a different compaction and drainage method.
- Installing a compacted base – using crushed rock, gravel, or sand to form a stable, level foundation for the pool shell.
- Managing drainage and runoff – ensuring rainwater flows away from the excavation zone to prevent waterlogging or erosion.
Excavation typically takes two to four days, depending on soil conditions, access, and weather. In wet or unstable areas, an additional day may be needed for stabilisation or drainage installation.
Once complete, the site is cleaned and levelled, ready for pool shell delivery and placement. This preparation step is crucial, a well-compacted base not only prevents future movement but also ensures your fibreglass plunge pool maintains perfect alignment over time.
Before excavation starts on clay-heavy blocks or tight access sites, our guide on common mistakes Sydney homeowners make when installing a fibreglass plunge pool shows what causes shell movement, drainage failures, and budget blowouts.
Step 4: Delivery and Pool Shell Placement
Once the site is fully prepared, it’s time for one of the most exciting moments, the delivery and placement of your fibreglass pool shell. This stage marks the visible transformation of your backyard from excavation to an almost-finished pool.
Your pre-moulded fibreglass shell is transported from the manufacturer to your property, often early in the morning to meet council and traffic permit conditions. Depending on your site layout, the shell may be craned over fences, rooftops, or other obstacles, or simply lifted directly into the excavation if access allows.
Before the shell is lowered into place, the installation team performs several safety and alignment checks:
- Verifying the base level using laser or digital levelling tools to ensure even support across the entire shell.
- Inspecting for debris or loose material that could affect stability or cause pressure points beneath the pool.
- Confirming measurements for correct positioning in line with approved site plans and boundary offsets.
- Assessing crane setup and overhead clearance, especially around powerlines, trees, or neighbouring properties.
Once the base is confirmed stable, the fibreglass pool shell is carefully lowered into position. The installer checks that it sits perfectly level, with uniform spacing around the edges. Minor adjustments may be made using sand or crushed rock to ensure proper alignment and prevent stress on the structure.
After the shell is secured, the team performs a final level inspection and documents the placement for engineering compliance. At this stage, your pool begins to take shape and you can finally visualise the finished design within your backyard space.
Depending on access and weather conditions, shell delivery and placement typically take half a day to one full day. With the pool now positioned and stable, the next step is plumbing, backfill, and electrical setup, which brings the system to life.
Step 5: Plumbing, Backfill, and Electrical Setup
After the fibreglass shell is positioned securely, the next stage is connecting all plumbing, filtration, and electrical systems that make your plunge pool function efficiently. This step ensures proper water circulation, energy performance, and long-term structural stability.
Plumbing and Equipment Installation
Our licensed installers begin by fitting the essential pool components including the pump, filter, skimmer box, return jets, and suction lines. These parts work together to keep the water clean and balanced.
- The pump circulates water through the filtration system.
- The skimmer box removes debris from the surface.
- The filter system (usually cartridge or sand type) clears fine particles and helps maintain crystal-clear water.
All pipes are connected to the shell’s pre-moulded fittings, sealed carefully to prevent leaks. The plumbing layout is designed for optimal water flow, reducing strain on the pump and minimising power consumption.
Backfilling and Structural Support
Once plumbing connections are complete, the installer begins backfilling around the pool shell. A sand-cement slurry or stabilised fill is compacted layer by layer to eliminate air pockets and secure the structure.
This process keeps the shell firmly in place and prevents ground movement or lifting during heavy rainfall or when the pool is empty for maintenance.
Laser levels are used throughout to maintain even pressure around the shell walls and preserve its perfect alignment.
Electrical Setup and Safety Compliance
An NSW-licensed electrician connects the pool’s electrical components, including pumps, heaters, chlorinators, and underwater LED lights. All electrical work is completed according to AS/NZS 3000 (Australian Wiring Rules) and NSW Fair Trading safety standards. Using unlicensed trades at this stage can void manufacturer warranties and lead to serious compliance issues, so professional installation is essential.
System Testing and Inspection
After plumbing and electrical work are complete, the team performs a pressure and leak test to confirm that the system operates correctly before backfilling is finalised. Any small adjustments are made before proceeding to the next phase; coping, paving, and finishing touches.
This step usually takes two to three days, depending on site access, equipment setup, and inspection scheduling. Once done, your pool’s core system is fully functional, ready for the finishing work that completes its look and usability.
How Fibreglass Pool Systems Work (Insulation, Filtration, and Circulation)
Fibreglass plunge pools are designed with built-in efficiency systems that make them easier and cheaper to maintain than most other pool types.
- Thermal Insulation:
The multi-layered fibreglass and gelcoat shell naturally retains heat, reducing overnight heat loss and keeping the water warmer for longer. This helps cut down on heater use and lowers energy bills. - Filtration Flow:
Water flows through a simple cycle: skimmer, pump, filter, return jets.
This closed loop keeps the pool water continuously moving, which reduces debris build-up and keeps it crystal clear with minimal effort. - Energy Efficiency:
Most fibreglass systems include a variable-speed pump, which adjusts flow automatically to maintain perfect circulation using less electricity.
This design meets BASIX efficiency standards, helping Sydney homeowners stay compliant while saving on running costs.
Compared to concrete pools, fibreglass models use fewer chemicals, less power, and less water over their lifespan. This makes them an eco-friendly and sustainable choice for modern Australian homes.
This stage usually takes two to three days to complete, depending on access, weather, and inspection timing. Once the system is tested and secure, the pool is ready for coping, paving, and finishing touches — the step that gives it its final look.
If you want the bigger picture on why fibreglass stays warmer, uses fewer chemicals, and suits compact yards, our complete guide to fibreglass plunge pools breaks down how the shell and circulation systems work together.
Step 6: Coping, Paving, and Aesthetic Finishes
With your plumbing and electrical systems installed, the next step is to complete the coping, paving, and surrounding finishes that give your fibreglass plunge pool its final look and long-term strength. This stage blends function and style, protecting the pool’s structure while creating a seamless connection to your outdoor space.
Pool Coping Installation
Coping forms the edge or “frame” around the top of your pool shell, covering the join between the fibreglass and the surrounding surface. It not only improves appearance but also helps prevent water from seeping behind the shell.
Coping materials are chosen for durability, slip resistance, and design compatibility with your home.
Common coping materials include:
- Travertine – timeless and natural, ideal for classic or resort-style spaces.
- Porcelain – durable, easy to clean, and available in modern colours.
- Granite – strong and elegant with excellent slip resistance.
- Concrete pavers – affordable and available in many textures and finishes.
- Composite decking – perfect for a warm, coastal look and easy underfoot comfort.
Each coping type is set using flexible adhesives and grout that allow for natural expansion and contraction under Sydney’s climate conditions. Expansion joints are added where needed to prevent cracking caused by heat or ground movement.
Paving and Surround Finishes
After coping, we install paving or decking around the pool to complete the look and enhance functionality. The paved area provides safe, stable footing for walking, lounging, or entertaining.
Drainage design is a key part of this step, paving is laid with a slight slope away from the pool edge to prevent water pooling and to comply with local safety standards. This ensures that rain or splash water flows away naturally, protecting both the surface and the pool structure.
Popular paving materials in Sydney include:
- Natural stone (travertine, limestone, sandstone) for a luxury resort feel.
- Porcelain tiles for a sleek, contemporary look.
- Concrete or exposed aggregate for durability and grip.
- Composite decking or hardwood timber for warmth and texture in coastal or shaded areas.
Lighting and Design Enhancements
To elevate the ambience, many homeowners choose LED lighting, water features, or frameless glass fencing as finishing touches.
- LED lights create a warm, inviting atmosphere for night swimming.
- Water features like sheer descents or bubblers add motion and sound.
- Frameless glass fencing provides safety without blocking the view, keeping the area bright and open.
For Sydney’s warm summers, light-coloured pavers and coping help reflect heat and maintain comfortable walking temperatures around the pool.
When coping and paving are completed, your pool area transforms into a fully integrated outdoor feature stylish, safe, and built to handle Australia’s climate.
The next step is filling, testing, and system calibration, where your pool becomes swim-ready.
Step 7: Filling, Testing, and System Calibration
After all plumbing, electrical, and finishing work is complete, it’s time to bring your fibreglass plunge pool to life. This stage focuses on filling the pool, checking for leaks, balancing the water chemistry, and calibrating all filtration and circulation systems to ensure everything runs smoothly from day one.
Filling the Pool
Water filling is done gradually to protect the fibreglass shell and maintain even pressure as the pool fills. The installer monitors the process closely, checking the shell’s position and ensuring that water and backfill levels rise together. This equal pressure prevents structural stress or wall distortion, especially during the initial fill.
Before filling, the installer confirms that:
- All fittings and valves are sealed and secure.
- The filtration and return lines are correctly connected.
- The electrical system has been inspected and cleared for operation.
System Testing and Leak Inspection
Once the water level reaches the skimmer opening, the team performs a full pressure and leak test across all plumbing and fittings. This test ensures there are no drips, air leaks, or weak seals in the system.
During testing, we also verify:
- Pump pressure and flow rate – to confirm smooth water movement.
- Skimmer and return jets – to ensure proper suction and balanced circulation.
- Filter performance – to confirm there are no blockages or leaks.
Each component is tested under normal operating conditions to ensure the pool performs safely and efficiently before handover.
Water Balancing and Chemical Setup
Proper water chemistry is critical for protecting your pool shell and maintaining clean, safe water. The installer checks and adjusts:
- pH levels (ideal range: 7.2–7.6)
- Alkalinity (helps stabilise pH)
- Calcium hardness (prevents corrosion or scaling)
- Sanitiser levels (chlorine or saltwater systems)
Once the balance is achieved, the water is circulated through the system for several hours to stabilise and confirm clarity.
System Calibration and Homeowner Guidance
The final stage involves fine-tuning your equipment for optimal efficiency and ease of use. The installer calibrates timers, pump speeds, and chlorinator settings to ensure the system runs at the right flow and energy output for your pool size.
You’ll also receive a personal demonstration on how to:
- Operate the pump, filter, and chlorinator.
- Backwash or clean filters.
- Maintain correct water levels and chemistry.
- Check pressure gauges and power settings.
This practical walkthrough helps you understand your system and maintain clear, healthy water with minimal effort.
When this stage is complete, your pool is fully operational and ready for its final safety inspection and certification. With the water balanced and the system calibrated, you’re just one step away from your first swim.
Step 8: Certification and Handover
Before you can officially enjoy your new fibreglass plunge pool, it must pass a final safety inspection and certification process. This step ensures your pool complies with NSW safety standards and council regulations, confirming it’s ready for safe everyday use.
Final Inspection and Compliance Checks
A certified pool inspector (either from your local council or a licensed private certifier) will visit your property to review all required safety features. The inspection typically covers:
- Pool fencing height and spacing – to ensure it meets the minimum 1.2 m requirement under the NSW Swimming Pools Act 1992.
- Self-closing and self-latching gates – confirming they automatically shut and latch securely from all open positions.
- CPR signage visibility – ensuring a clear and durable resuscitation sign is displayed near the pool area.
- Barrier condition – checking for climbable objects, gaps, or weak points in the fence or gate.
- Drain covers and skimmer boxes – verifying safety compliance and preventing suction hazards.
These checks confirm that every safety feature meets the Australian Standard AS1926.1 – Safety Barriers for Swimming Pools.
Booking the Inspection
It’s best to book your inspection a few days before handover, giving you time to fix small details like latch adjustments or fence gaps if needed. Your pool builder or certifier can help schedule the inspection and address any compliance concerns before the final sign-off.
Receiving the NSW Pool Compliance Certificate
Once your pool passes inspection, you’ll receive an official NSW Pool Compliance Certificate. This document certifies that your pool meets all safety, fencing, and signage requirements. The certificate remains valid for three years unless major changes are made to the pool or surrounding structures.
Homeowners are required to register their pool on the NSW Swimming Pool Register, which records all compliant residential pools across the state. This registration is mandatory for property sales and leases.
Final Handover
After certification, your installer will complete the handover process, which includes:
- Providing warranty information for the fibreglass shell and equipment.
- Handing over maintenance manuals and equipment guides.
- Confirming electrical safety certification from the licensed electrician.
- Conducting a final walkthrough to ensure everything is functioning correctly.
This marks the official completion of your pool installation. You can now enjoy your new fibreglass plunge pool knowing it’s safe, compliant, and built to Australian standards.
Timeline & Cost Overview — From Plan to Plunge
Installing a fibreglass plunge pool in Sydney is a relatively quick process compared to other pool types. Most projects move from design to swim-ready in just a few weeks.
Typical timeline:
- Planning and approvals: 2–4 weeks (for design, permits, and engineering documents)
- Excavation and installation: 1 week (depends on soil, access, and weather)
- Finishes and certification: 1–2 weeks (for paving, lighting, and safety inspection)
In total, expect around 4–6 weeks for a standard installation.
Estimated cost range: between $35,000 and $60,000, depending on factors like pool size, access for machinery or cranes, paving materials, and optional upgrades such as heating, lighting, or water features.
Fibreglass plunge pools offer a faster, cleaner, and more cost-effective installation than concrete pools, which can take 8–12 weeks and require more complex site work.
Lifecycle Cost & Maintenance Outcomes
A well-installed fibreglass plunge pool delivers not only quick installation but also excellent long-term value. These pools are designed for low maintenance, energy efficiency, and durability, making them one of the most cost-effective choices for Sydney homeowners.
Long-Term Cost Advantages
Compared to concrete or vinyl pools, fibreglass models require less frequent servicing, fewer chemicals, and minimal resurfacing over their lifespan. Their non-porous gelcoat surface resists algae growth and chemical absorption, helping you save on cleaning time and maintenance costs.
Typical cost differences:
| Factor | Fibreglass Pool | Concrete or Vinyl Pool |
|---|---|---|
| Yearly maintenance cost | Around 30–40% lower, due to reduced chemical use and cleaning effort | Higher, because porous surfaces trap dirt and need more chemicals |
| Average lifespan | 20–30 years without resurfacing | 10–20 years, requires resurfacing or liner replacement |
| Cleaning effort | Easy to maintain; smooth shell resists algae and staining | More scrubbing needed; algae and calcium build up faster |
| Water efficiency | Lower evaporation and minimal backwash waste | More frequent topping up and backwashing |
| Energy efficiency | Retains heat longer; compatible with variable-speed pumps | Greater heat loss; higher running costs |
| Environmental impact | Fewer chemicals and less water usage | Higher power and chemical consumption |
Maintenance Routine
Keeping your fibreglass plunge pool in top condition is simple:
- Weekly: Skim debris, test pH, and adjust chlorine or salt levels.
- Monthly: Clean filters and check pump operation.
- Annually: Schedule a professional inspection to ensure plumbing, electrical, and gelcoat integrity remain in good condition.
With consistent care, a fibreglass pool remains attractive and functional for decades, offering a smooth swimming experience with fewer ongoing costs compared to traditional pool types.
Conclusion
Installing a fibreglass plunge pool is one of the most rewarding home upgrades you can make. With careful planning, quality materials, and professional installation, your backyard can transform into a private resort-style retreat that enhances your lifestyle year-round.
At Plunge Pools Sydney, we bring years of local experience and technical know-how to every project. From the first site visit to final certification, our team handles every stage with precision and care — so you can focus on enjoying your new outdoor space.
Start planning your dream backyard today with a free site assessment and quote from Plunge Pools Sydney. Let’s make your resort-style living a reality, right at home.
FAQS
Can a fibreglass plunge pool be installed partially above ground on a sloped Sydney block?
Yes, fibreglass plunge pools can be installed partially above ground on sloped sites using engineered retaining walls or reinforced frames. This method is common in Sydney’s hillside suburbs, where ground levels vary. A qualified installer will assess soil stability and structural support to ensure proper drainage and long-term durability.
What is the best time of year to install a fibreglass plunge pool in Sydney’s climate?
The best time to install a fibreglass plunge pool in Sydney is during autumn or spring, when weather is mild and rainfall is low. These seasons help reduce excavation delays and allow faster curing of surrounding finishes. Planning installation outside peak summer demand also ensures quicker council approvals and scheduling.
Are there size or depth restrictions for fibreglass plunge pools under Sydney council rules?
Most Sydney councils allow plunge pools up to 6 metres long and 1.8 metres deep without extensive structural variation, provided boundary offsets and fencing rules are met. Local development control plans (DCPs) may specify minimum setbacks and safety barrier heights. Always check your council’s swimming pool guidelines before design finalisation.
What are the warranty terms typically offered for fibreglass pool shells and equipment?
Fibreglass pool shells usually include a structural warranty of 25–30 years and a gelcoat surface warranty of around 7–10 years. Pumps, filters, and heaters generally carry 2–5 year manufacturer warranties. Choosing a licensed Sydney installer ensures these warranties remain valid through compliant installation and registration.
Are eco-friendly or saltwater filtration systems compatible with fibreglass plunge pools?
Yes, fibreglass plunge pools work well with both saltwater chlorinators and eco-friendly filtration systems. The smooth gelcoat surface resists corrosion and mineral buildup, making it ideal for low-chemical maintenance. Many Sydney homeowners pair variable-speed pumps with cartridge filters to reduce energy use and improve water efficiency.
How can homeowners extend the lifespan of their fibreglass plunge pool through proper care?
Regular water balancing, gentle cleaning, and maintaining correct pump operation can extend a fibreglass pool’s lifespan well beyond 25 years. Avoid using abrasive brushes or high-chlorine shock treatments that may dull the gelcoat. Routine professional inspections also help detect small cracks or plumbing issues before they become major repairs.